Getting Started with ContentBarrier
ContentBarrier is installed in your Mac's Applications folder. To open ContentBarrier, go to this folder, then double-click the ContentBarrier application icon. You can also launch ContentBarrier by clicking its icon in the Dock.

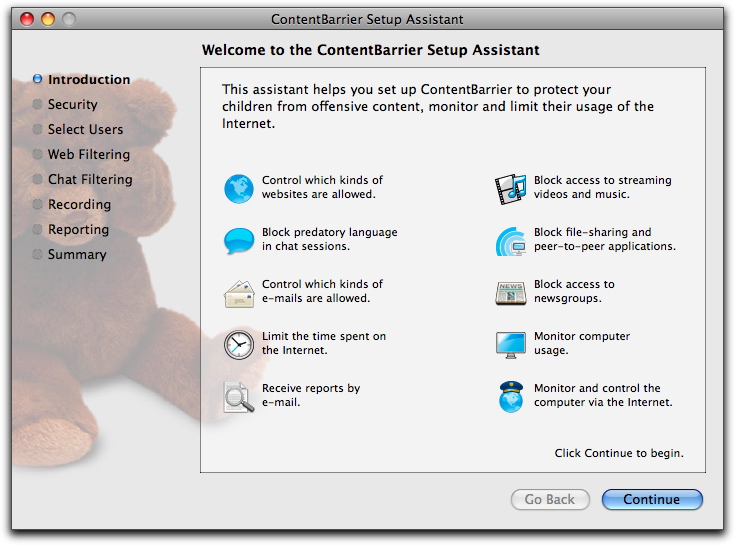
The first time you launch ContentBarrier, the ContentBarrier Setup Assistant displays:
Using the Setup Assistant
ContentBarrier's Setup Assistant helps you quickly and easily adjust the program's basic settings so they are appropriate to the way you use your Mac. The first time you open ContentBarrier, the Setup Assistant launches automatically.
If, at any time, you want to launch the Setup Assistant manually, you can do so by choosing Window > Setup Assistant…. You will need an administrator's password to run the Setup Assistant.
This assistant walks you through the configuration process, and explains the types of content that ContentBarrier filters, and how this filtering is done. Click Continue to start configuring your users. If, at any time, you wish to return to a previous screen, click the Go Back button.
Setting an Administrator Password
The second screen of the ContentBarrier Assistant asks you to set an administrator password for ContentBarrier .
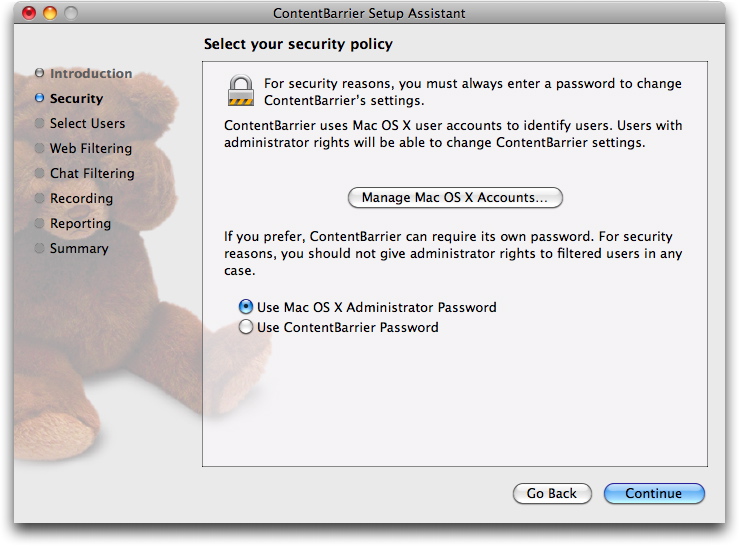
You always need an administrator password to change ContentBarrier's settings. This prevents your users from accessing and changing their own settings. ContentBarrier gives you two options: you can use your Mac OS X administrator password, or you can set a special ContentBarrier administrator password.
The advantage to using a Mac OS X administrator password is that any user with administrator access to the protected Mac will be able to make changes to ContentBarrier's settings. Since you can have several user accounts with administrator access under Mac OS X, this allows you to ensure that, in certain environments such as schools, an administrator who can access and change ContentBarrier's settings is always available.
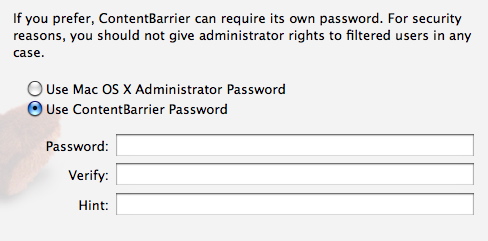
If you are using ContentBarrier on a home computer, you may only have one administrator. In this case you can also use the Mac OS X administrator password. However, if you want extra security, or if you want to limit the ability to make changes to ContentBarrier's settings to specific administrators, you can set a special ContentBarrier password. To do this, check Use ContentBarrier Password and fill in the fields that appear: first, enter a password, then enter it again in the Verify field, then enter a hint that will remind you of the password, in case you forget it, in the Hint field.
Click Continue to go to the next screen, or click Go Back to return to the previous screen.
You can change this password at any time in the Password pane of the Preferences window. To access it, choose ContentBarrier > Preferences….
User Selection
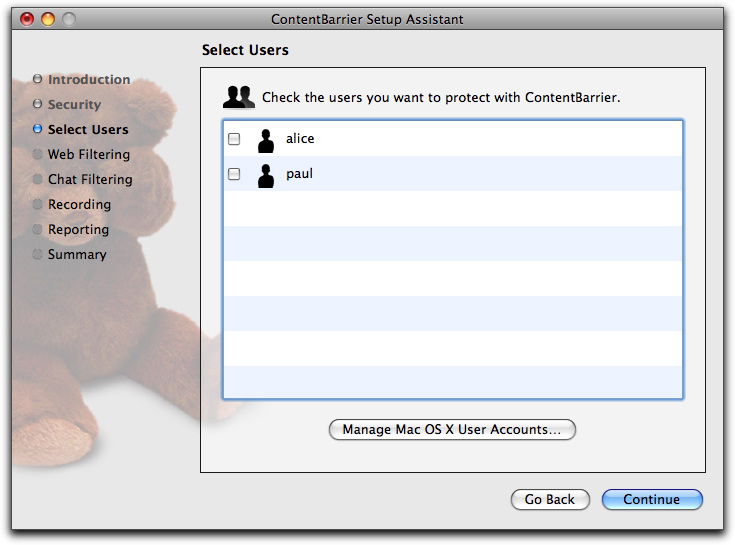
The next screen of the assistant lets you select which users you wish to configure. This screen shows all the users you have on your Mac (including the Guest account if you have activated it in your Mac's Accounts preferences).
There are two types of user accounts: administrators and standard users. Administrators are permitted to make system-level changes to your computer to, for example, install software. If you attempt to protect an Administrator's account with ContentBarrier, you'll get a warning saying, "For security reasons, filtered users should not have administrator rights." ContentBarrier will still let you set up protection for such users, although they might be able to use their administrator privileges to change or remove your settings.
But if you've set a special ContentBarrier password, even users who are administrators will not be able to make changes to ContentBarrier's settings. While the ContentBarrier password prevents administrators from changing the program's settings, any user who is an administrator will be able to uninstall the program. Therefore, if you have not set a special ContentBarrier password, it is best to use standard accounts for users for whom you wish to filter content.
If you need to make changes to any user accounts, such as adding or removing administrator privileges, or if you wish to add, edit or remove any user accounts, click Manage Mac OS X User Accounts; this opens the Accounts preference pane. For more on managing user accounts, see the Mac OS X help.
To configure users, check the boxes next to their names, then click Continue. In the assistant screens that follow, the same protection will be set for all users you select here. However, you'll be able to customize the settings for each person later. If you wish to use the Setup Assistant to configure settings for one user, you can do so, then run it again (by choosing Window > Setup Assistant…) for another user.
Web Filtering Setup
ContentBarrier next presents you with three options for preventing the selected users from accessing certain web sites. They are:
- Allow access to all web sites, which does not filter the web;
- Block some web site categories, which lets you block web sites containing content belonging to a basic set of categories; and,
- Only allow selected web sites, which gives you the opportunity to restrict the user's web use to only those "whitelisted" sites you specify.
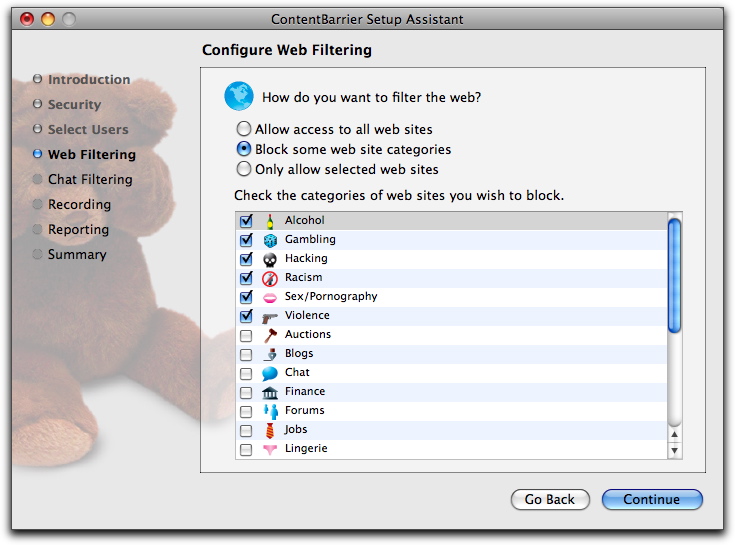
The default setting blocks web sites in the Alcohol, Gambling, Hacking, Racism, Sex/Pornography, and Violence categories, and you can add or remove categories by checking and unchecking their boxes. Intego constantly updates its lists of suspect websites, so you don't have to surf the web to determine which sites fall in these categories; these updates are available in the ContentBarrier filters that you can download and install using NetUpdate.
If you choose to only allow selected websites, your user(s) will be unable to access any website until you create a list of permitted sites. You add sites to the list by clicking the plus sign at the bottom of the screen, which puts "www.example.com" into the list.
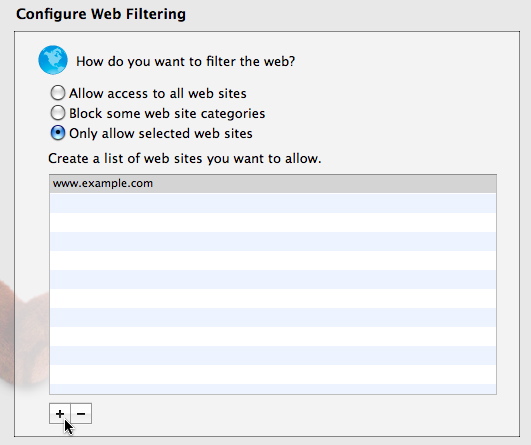
To change this to the site of your choice, double-click on that line and type the site you want to allow. Note that all subdomains will be allowed, so allowing google.com also allows www.google.com, maps.google.com, and news.google.com. However, the opposite isn't true: if you allow only www.google.com, the user will be unable to reach google.com (without the www.)
After you've confirmed the settings you want, click Continue to go to the next screen.
Chat Filtering Setup
This screen lets you decide which chat filter settings you wish to use.
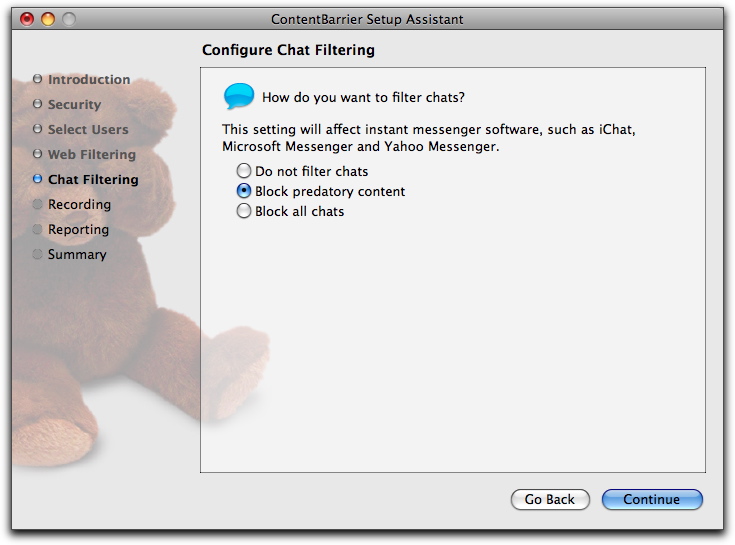
You have three options:
- Do not filter chats: This lets users chat with no restrictions.
- Block predatory content: This lets users chat, but enables ContentBarrier's AntiPredator function, which filters language deemed predatory in chat sessions. (We'll show you how to see and manage the list of "predatory" phrases in the later section, Chat Filtering.)
- Block all chats: This prevents users from accessing any chat applications.
After you've confirmed the settings you want, click Continue to go to the next screen.
Recording Setup
This screen lets you keep an eye on your user's activity, recording screenshots and keyboard activity to ContentBarrier's logs.
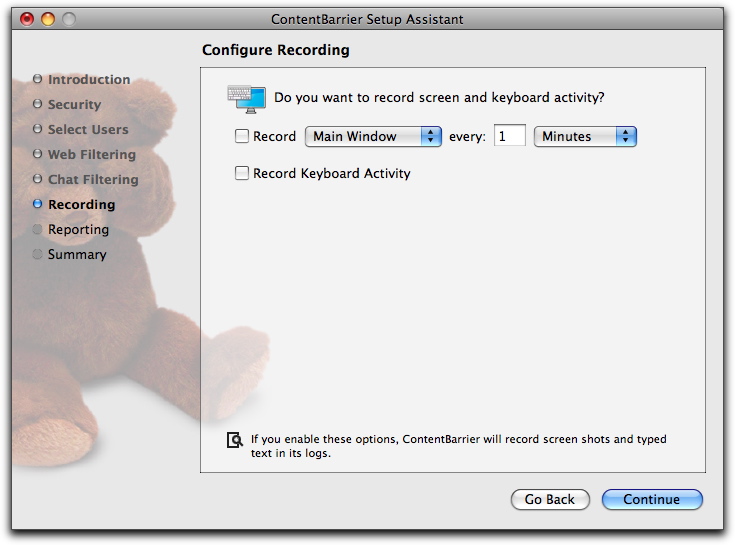
By clicking the Record checkbox, you make ContentBarrier take a screenshot of either the Main Window - that is, the frontmost one - or of everything visible on the computer, including additional monitors, if any, if you select All Screens from the popup menu. You can also decide how often these screenshots will be created, from one per minute to one per 999 hours.
If you click the Record Keyboard Activity checkbox, you keep track of all typing done by the user, in all applications. You can see these graphics and text files by looking at ContentBarrier's log, as is described in the section, Using Logs.
After you've confirmed the settings you want, click Continue to go to the next screen.
Reporting Setup
This screen lets you determine how ContentBarrier reports users' activities to you via e-mail or the web. Regardless of what you set on this screen, you can always monitor user activity by viewing ContentBarrier's log, as is described in the section, Using Logs.
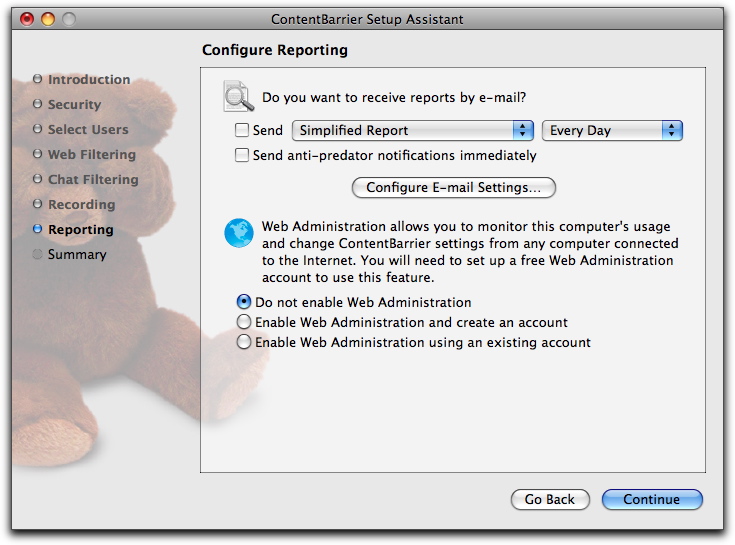
If you check the first checkbox, you'll receive reports of user activity by e-mail. Depending on what you choose in the first popup menu, your reports will be shown as "Simplified", "Complete", or "Compressed Complete". For details on these formats, see the section Exporting Log Reports.
You can choose to receive these reports either daily (at the time at which you set up this option) or weekly (at the same time and day at which you set up this option).
If you check Send AntiPredator notifications immediately, ContentBarrier will send you an e-mail whenever it detects predatory activity, according to its rules regarding text content.
But before ContentBarrier can send you any e-mail notifications, you must tell it which e-mail server to use, who should receive the alerts, and where they should come from. To create these settings, click Configure E-mail Settings….
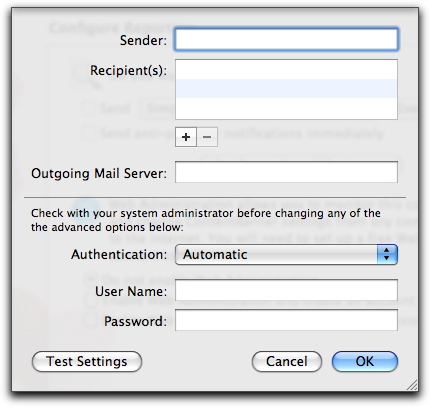
In the Sender box, type the e-mail address you'd like these reports to appear to come from. In the next box, add recipients by clicking the plus sign, then typing an e-mail address. To delete any e-mail addresses, select them and click - .
In the rest of this window, you define how e-mails will be sent: the server, user name, password, and authentication scheme. You can probably find this information by checking the settings in your e-mail program; if not, ask your ISP or your computer's administrator.
Click OK to save these e-mail settings, which will return you to the window to configure Web Administration settings. If you haven't already created a free Intego Web Administration account, select Enable Web Administration and create an account. You'll then be prompted to give an e-mail address to identify yourself, a password for the account, and verification of that password. (If you already have an account, select Enable Web Administration using an existing account; if you don't want to use Web Administration, select Do not enable Web Administration.)
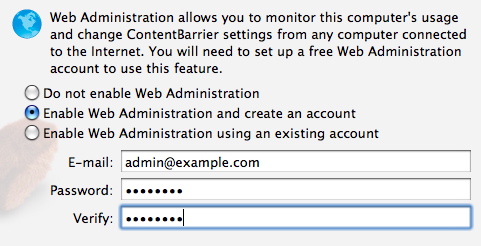
When you click Configure, you'll get a brief message that the account is being set up. After you've configured reporting preferences to your liking, click Continue to finish the setup process.
Finishing
You've now reached the end of the setup process, and will see a confirmation screen. Click Configure to apply the changes you specified and go to ContentBarrier's main screen.
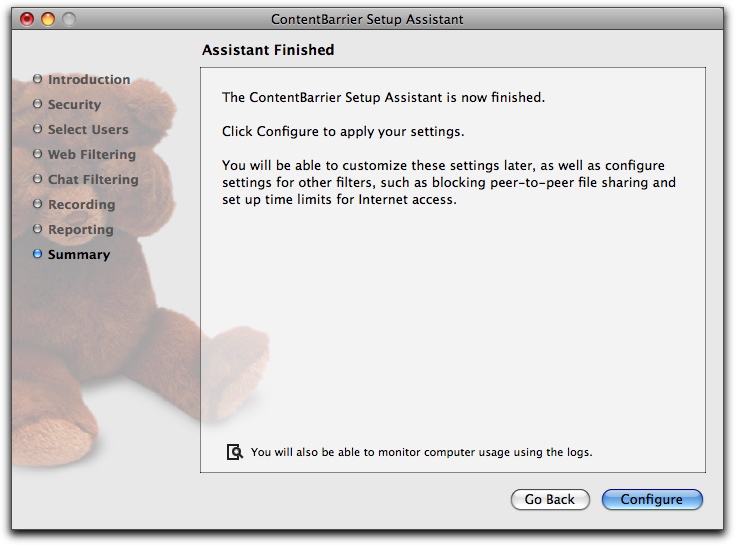
Congratulations! You've successfully told ContentBarrier how to block users' access to parts of the Internet. If you wish to reconfigure your users, or configure new users by using the Assistant, you can do so at any time by choosing Window > Setup Assistant… while ContentBarrier is running.
Setting Up Web Administration
ContentBarrier includes a way to monitor Internet use on your computer even when you're far away, through a Web Administration interface that you can view from any web browser. First, you must set up a free account: if you haven't already set up an account in the ContentBarrier Setup Assistant, choose ContentBarrier > Preferences…, then click the Web Administration icon.
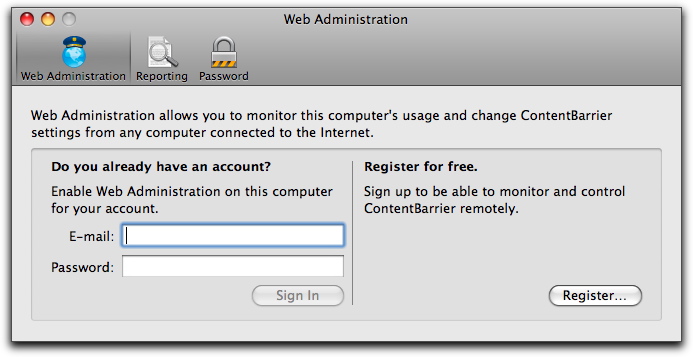
If you have a ContentBarrier Web Administration account and need to sign in, enter your e-mail address and password, then click Sign In. If you don't have an account, click Register… in the sheet that displays, enter your e-mail address, your password, then confirm your password. Click Create to create your account.
In either case, when you're done you'll see a screen telling you that web reporting is enabled, and offering you the opportunity to disable it, if you wish. To connect to your ContentBarrier Web Administration web page, click Open Web Administration (or click this link to go to the Web Administration page). Your web browser will take you to a login page, where you must enter the e-mail address and password you used to set up your account.
After logging into your Web Administration page, you'll see a log page, which displays information about your users and their activity. For more information about using online Web Administration for ContentBarrier, click the Help button on that web page; you'll be taken to an online help page.
Managing Users
When you set up ContentBarrier, you are its administrator, with access to all the controls that limit or grant permission to access the Internet. The people you are overseeing - whether children or employees - are called users. This section shows you how to create and delete users, and control how you and other administrators see users.
When you've finished running the Setup Assistant, and every time you launch ContentBarrier thereafter, you'll see its main window.
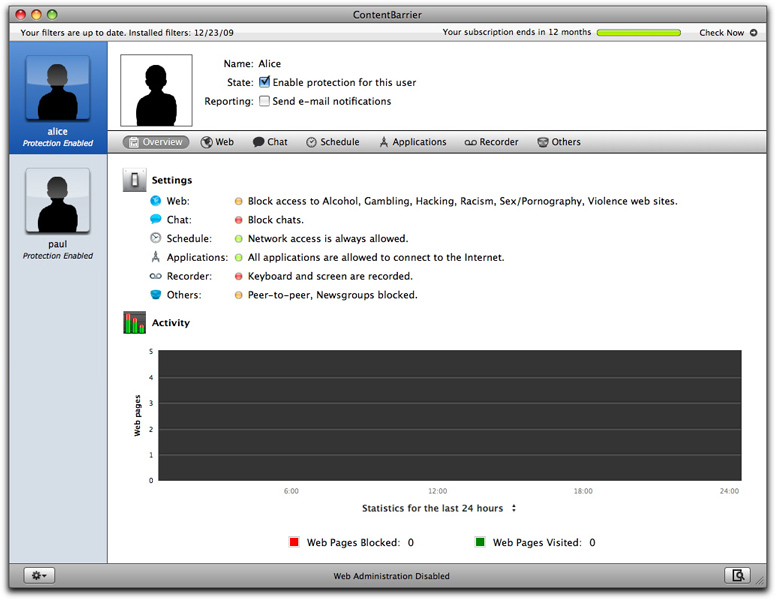
At the left is a list of your users. If you click a user, the right-hand pane shows you which settings are applied to that user. Two checkboxes next to the user's icon give you quick access to frequently used functions: the Enable protection for this user checkbox lets you turn ContentBarrier's filtering on and off, while the Send e-mail notifications checkbox informs you of certain access attempts. (For more information about how to change which e-mail notifications you get, see the section, Setting Log Preferences.)
Mac OS X 10.5 (Leopard) and later offer a "Guest" account that you can configure in Mac OS X's Accounts preference pane. If you activate the Guest account, any user can log in temporarily; they have standard access to your Mac, but when they log out, their user folder is deleted. This is great for when you have visitors who want to use your Mac temporarily.
If you enable the Guest account in the Account preferences, ContentBarrier will display this user in its Users list. You can apply settings to the Guest account, which will then apply each time someone logs in as Guest. If your children have friends who may user their Mac, you might want to use the same protection on the Guest account as on your children's accounts.
Changing User Display
ContentBarrier displays users by default as silhouettes with large icons in the left-hand column of the program's window. You can change this display, customizing each user's image, name and more.
If you click the Action button at the bottom of the user list, you can choose to display small user icons and/or full names. Choose either of these options to change the display.
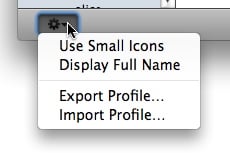
Choosing small user icons is practical if you have many users, and using full names is helpful if you have several users with the same first name.

You can also make these changes from the View menu: choose View, then choose Use Small Icons or Display Full Name.
Exporting User Profiles
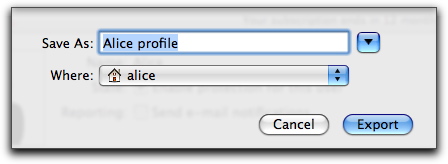
After you create a profile for one of your users, you may want to apply the same profile to others. To do this, apply all the settings and filters you want to a user. Make sure you have selected that user in the ContentBarrier Users list, then select Export Profile… under either the File menu or in the Action menu (the one with the gear) at the bottom of the window.
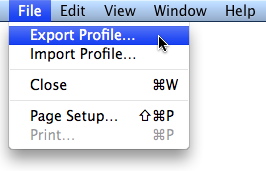
Give the profile a name and save it wherever you want.
If you wish to apply this profile to another user, click that user's name, then select Import Profile… from either the File menu or in the Action menu at the bottom of the window. Locate the saved profile in the Open dialog that displays, then click OK. All the settings contained in this profile will be applied to the selected user. You can make changes to this user's settings, modifying the settings you imported from the saved profile, but these changes will not affect the saved profile. In this way, you can set up a standard profile for many users, then apply it to others. You can also set up a number of profiles based on the ages and maturity of your users, and using the import/export function, apply them to new users as needed.
Editing User Icons
ContentBarrier allows you to change the icons associated with your users, even letting you add their photos. To do so, click on a user in the Users list. The top section of the ContentBarrier window shows you information about this user.
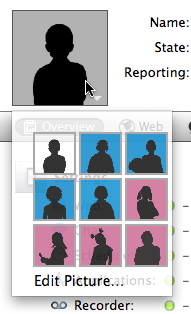
To change the user's icon, click it. Choose one of the default silhouettes, or choose Edit Picture to add a photo of the user.
Drag an image file to the image well, or click Choose to browse and find a photo. If your Mac has a built-in camera or you have an external camera, you can take a video snapshot. When you have added your picture, click Set to apply it, then click Save to save the changes you have made to your user's information.