Personal Antispam Settings and Preferences
- Settings and Statistics Modes
- View Options
- Other Personal Antispam Settings
- Viewing Antispam Statistics
- Working with Personal Antispam Filters
- The Personal Antispam Log
- Using the Intego Menu
Personal Antispam gives you a great deal of flexibility in the way the program filters spam. You can use its settings to refine Personal Antispam's filtering and features, and make the program work the way you want it to.
Settings and Statistics Modes
When you open Personal Antispam, the program displays its settings screen. This window displays general settings, shows whether antispam protection is on or off, displays which e-mail programs Personal Antispam is protecting, and provides information about specific spam filters.
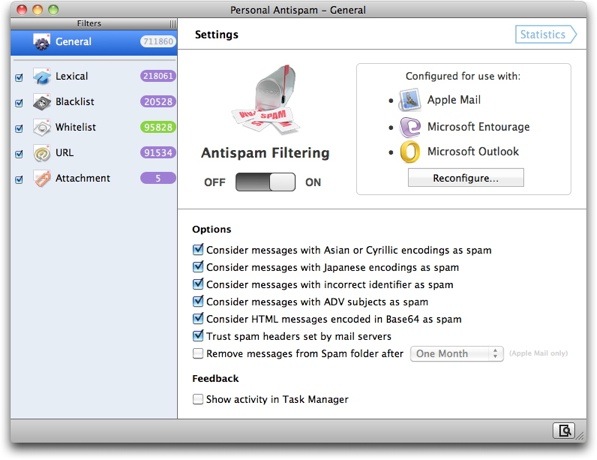
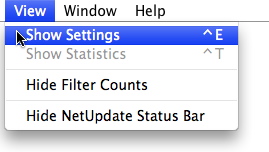
If any other screen is visible, you can return to the settings screen by clicking General, in the Filters list, then clicking Settings, if Statistics are visible; you can also choose View > Show Settings, or press Control-E.
The Statistics screen shows you how many e-mails Personal Antispam has analyzed and how many it's flagged as spam in the past day, week, or month. To reach this screen, click Statistics in the upper-right corner of the window, choose View > Show Statistics, or press Control-T.
You can reset the statistics for all windows at any time by clicking the circular arrow in the bottom-right corner of the chart. A warning window will appear, asking you to confirm your decision. Note that this button is an all-or-nothing choice: clicking it will remove all statistics, for all filters, that you've accumulated so far.
View Options
Personal Antispam offers two view options, which apply to all the program's screens. You can activate or deactivate these options from the View menu.
Viewing Filter Counts
You can choose to show or hide filter counts, which show the total number of spams that Personal Antispam has detected, along with the number detected for each of the program's filters (or, for the whitelist filter, how many valid messages were found using that filter). These filter counts display next to the name of each filter.
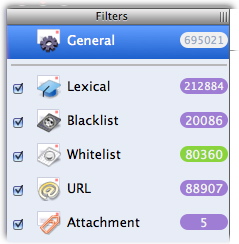
To hide filter counts, which are displayed by default, select View > Hide Filter Counts. To display them again, select View > Show Filter Counts.
Viewing the NetUpdate Status Bar
You can also choose to show or hide the NetUpdate Status Bar, which displays at the top of the Personal Antispam window. This status bar shows the date of the latest installed filters, the most recent filters available, the amount of time remaining in your Personal Antispam subscription, and a Check Now… button. Click this button to launch NetUpdate and check for updates to Personal Antispam and other Intego software you have installed.

To hide the NetUpdate Status Bar, which is displayed by default, select View > Hide NetUpdate Status Bar. To display it again, select View > Show NetUpdate Status Bar.
Subscriptions and Updates
When you purchase Internet Security Barrier X6, which includes Personal Antispam, you can use the software for a set period of time, usually one year from the date of purchase. This subscription period includes access to program and filter updates. After this time, you can renew your subscription using NetUpdate.
For information about and updating Personal Antispam and its filters with Intego NetUpdate, see the Intego X6 Getting Started Manual.
Activating and Deactivating Antispam Protection
By default, Personal Antispam's antispam protection is on, but you may want to turn it off temporarily. To do this, click the Off button on the main screen.
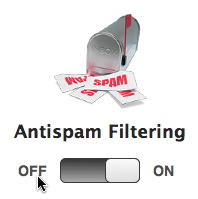
Don't forget to turn this protection back on when you want it to filter your spam again-just click the On button to do this.
Other Personal Antispam Settings
Personal Antispam offers other settings that allow you to control the way the program displays. These settings let you refine the way Personal Antispam flags messages as spam, or provide visual feedback when Personal Antispam detects spam or valid e-mail messages.
E-mail Settings
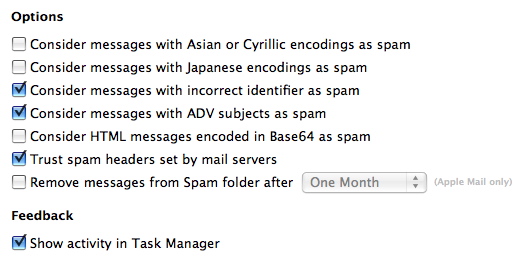
Personal Antispam has several options that allow you to flag specific types of messages as spam. You can have Personal Antispam automatically consider messages with certain types of text encodings as spam if you don't work with Japanese, other Asian languages, or languages that use Cyrillic characters. By default these options are deactivated. If, however, you never work with such languages, check the appropriate options.
-
The first option, Consider messages with Asian or Cyrillic encodings as spam, considers messages with these encodings as spam; the second option, Consider messages with Japanese encodings as spam, flags only messages with Japanese encodings.
-
The third option, Consider messages with incorrect identifier as spam, looks at a part of the e-mail message that's usually hidden, called the "header," to see if the message purports to be something it's not. Spam often contains headers that are incorrect, and checking this option can spot many spam messages without even needing to examine their contents. However, if you get many false positives (legitimate messages marked as spam) you might want to deactivate this option.
-
The fourth option, Consider messages with ADV subjects as spam, automatically flags any e-mail with ADV or similar abbreviations in the subject line, as spam. (Some legislation requires senders to label commercial spam messages in this way; however, few do.) You can uncheck this option if you get valid e-mails with this abbreviation in the subject line.
-
The fifth option, Consider HTML messages encoded in Base64 as spam, looks for a common spam trick that involves encrypting messages in a format that you can read, but that some antispam tools can't. Personal Antispam knows this trick, and lets you stop all messages encoded in this format. Because some valid e-mail is in Base64 format, this option is off by default.
-
The sixth option, Trust spam headers set by mail servers, takes into account the fact that many Internet Service Providers (ISPs) run antispam programs on their mail servers, so suspected spam is filtered or labeled before it ever reaches your mailbox. This option is on by default, which means that Personal Antispam will consider "spam" any message your ISP has labeled as such. If you'd rather let Personal Antispam have complete control of these decisions, uncheck this box.
-
The seventh option, Remove messages from Spam folder after, allows you to direct Personal Antispam to automatically delete spam from the Spam folder in Apple Mail. (This feature doesn't work with Microsoft Entourage or Outlook.) You can choose to have messages deleted after they've sat there for one day, one week, or one month. This option is off by default, which means that messages will remain in your Spam folder until you manually remove them in Apple Mail: you may wish to do this until you've gotten in the habit of checking your Spam folder for valid e-mails regularly.
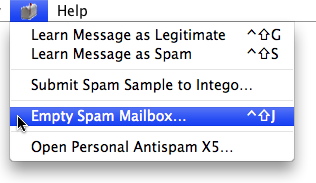
You can empty your Spam folder at any time by selecting all messages in it and pressing Delete. In Apple Mail you can also empty the Spam folder by choosing Empty Spam Mailbox… from the Script (the Intego mailbox icon) menu or pressing Shift-Control-J. In either case, you'll see a warning message that asks you to confirm your action.
The final option, Show activity in Task Manager, controls whether you see a small window in front of your e-mail program while Personal Antispam filters messages that those programs receive. This option is on by default: uncheck it if you'd prefer that this window does not appear.
Viewing Antispam Statistics
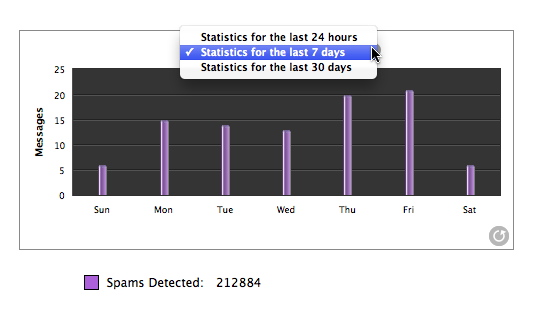
Personal Antispam displays a graph of e-mails analyzed and spams detected both in the General window and for each of its filters. You can choose from three displays for this graph: the last 24 hours, the last 7 days, or the last 30 days. To change the display, click the popup menu showing the display range and choose a new range.
Note: the number of e-mail messages shown as analyzed in the different statistic graphs depend, in part, on the position of the Personal Antispam rule in your e-mail program's list of rules. See Position of the Personal Antispam Rule in Welcome to Personal Antispam for more on choosing the appropriate position for this rule.
Personal Antispam uses the same type of graph for each filter. To view these statistics, click one of the filter icons in the Personal Antispam toolbar, then click Statistics in the window's upper-right corner.
Note that statistics for each of the different filters will show a different number of e-mails analyzed. When one of Personal Antispam's filters detects a good message or a spam message, other filters may not examine it. Personal Antispam's filters examine your e-mail in the following order:
- Attachment filter
- URL filter
- Whitelist
- Blacklist
- Lexical filter
It is therefore normal that you see different numbers of e-mails analyzed for each of these filters, and for the overall number of messages.
Working with Personal Antispam Filters
Personal Antispam uses a set of filters as you have seen above. Each filter has its own settings, which you can adjust. While it is advisable to leave all of these filters active, you can deactivate any of them if you wish. To do so, simply uncheck the box next to one of the filters.
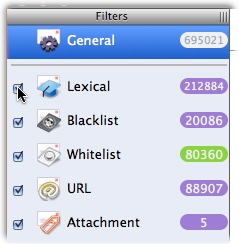
You can reactivate the filter by checking the box next to its name.
You can also activate or deactivate filters from the Intego menu. Choose the Intego menu in your menu bar, then Personal Antispam and select one of the filters to turn it on or off.
Lexical Filter Settings
Personal Antispam uses a powerful lexical filtering system, also known as Bayesian Analysis, to examine the words contained in your e-mail and determine which messages are valid and which are spam. The lexical filter is a statistical filter that determines whether incoming e-mail messages are spam or not. This filtering depends on a database installed with Personal Antispam and by how you have categorized e-mail messages that you have received.
To view settings for the lexical filter, click on Lexical in the filter list at the left of the Personal Antispam window.
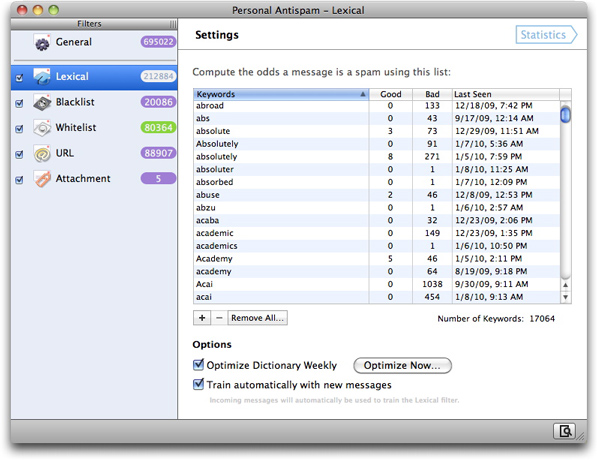
If, for any reason, you want to turn off the lexical filter, uncheck the box next to its name in the filter list at the left of the Personal Antispam window. To turn the filter on again, click the box next to its name.
The lexical filter screen shows you all the words that Personal Antispam has added to its lexical database. You can examine these words to see how often they appear in legitimate e-mail messages or in spam, as well as the last date and time that they were seen.
Words get added to the lexical filter database when you use Personal Antispam's functions or AppleScripts to learn messages as legitimate or learn messages as spam. The more messages you teach Personal Antispam, the more efficient its lexical filter becomes. You can also add your own keywords - words that you want to flag as good or bad - by clicking the + icon below the keyword list, and adding a word.
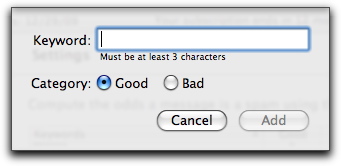
Click either the Good or Bad radio button to add your keyword to that section of the list. When you add keywords in this manner, they get a score of 10, as if you added messages containing those keywords ten times. This ensures that Personal Antispam will correctly sort messages containing those keywords as legitimate e-mail or as spam.
You can sort the words in the lexical filter database by clicking one of the column headers; this sorts the database by that header. Clicking again changes the sort order. In this manner, you can examine the lexical filter database in alphabetical order, by the number of good or bad occurrences, or by last seen date.

If you want to remove any words from the database, click a word to select it, then either click the - button or press Delete. You can remove several words at once by holding down the Command key while clicking each in turn to select them; then click the - button or press Delete. An alert will ask you if you really want to remove all the words - you cannot undo this action. If you do want to remove these words, click Remove; if not click Cancel.
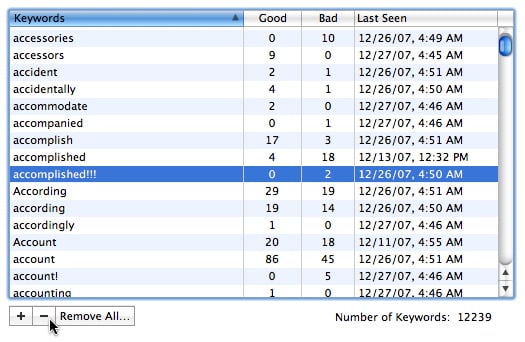
If you want to clear the entire database, click Remove All. An alert will ask you if you really want to remove all the words - you cannot undo this action. If you do want to empty the database, click Remove; if not click Cancel.
The lexical filter has two options. In the first, you can improve its speed and overall performance by checking Optimize Dictionary Weekly. Personal Antispam will then examine the lexical filter database once a week and remove words that have not been seen frequently or recently. The Optimize Now… button forces Personal Antispam to perform this function immediately. If you click it, a warning appears that the process cannot be undone: click Optimize to continue or Cancel to stop the process.

The second option, Train automatically with new messages, adds the words of all messages you receive to the lexical filter, sorting them as belonging to "spam" or "good" messages according to the filters already in place. This helps reinforce Personal Antispam's lexical database, ensuring optimal spam filtering.
Blacklist Filter Settings
Personal Antispam uses a blacklist and a whitelist to help filter spam. A blacklist is a list of addresses from which you receive spam. You can add addresses to the blacklist, to block any spam that is not detected by Personal Antispam's filters but that comes often from the same address.
The blacklist filter also allows you to add specific strings that Personal Antispam will search for in message headers such as the Subject, the From or To headers, and more. You can set precise filters for most message headers, allowing you to filter specific types of spam that you receive often. To view settings for the blacklist filter, click on Blacklist in the filter list at the left of the Personal Antispam window.
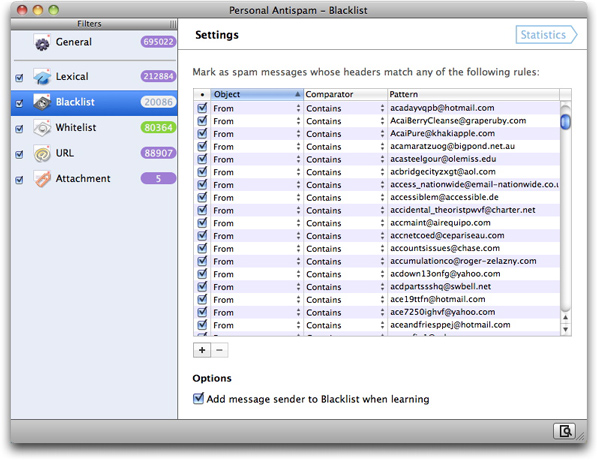
If, for any reason, you want to turn off the blacklist filter, uncheck the box next to its name in the filter list at the left of the Personal Antispam window. To turn the filter on again, click the box next to its name.
The blacklist filter offers one option to help Personal Antispam fight spam more efficiently. If you check Add message sender to Blacklist when learning, Personal Antispam adds the From address in every e-mail message you tell the program to learn as spam to the blacklist. This marks all future messages from these senders as spam automatically.

The blacklist filter is empty when you first start using Personal Antispam, and addresses are added as you tell Personal Antispam to learn from your spam, if you have the Add message sender to Blacklist when learning option checked (as explained above). You can sort the contents of the Blacklist filter list by clicking one of the column headers; this sorts the database by that header. Clicking again changes the sort order.
You can also add your own entries to this filter. To do this, click the + button. Personal Antispam adds a new line to the filter list.

There are three fields in this filter list: Object, Comparator and Pattern.
In the Object field, you can select from a number of e-mail message headers. Click the From cell and a popup menu displays:
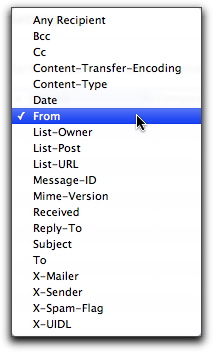
Select the header you want the filter to search for.
The Comparator field lets you select how Personal Antispam is to match the selected header. Click the Starts With cell and a popup menu displays:
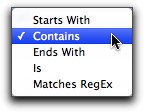
Select the comparator you want the filter to use. The first four - Starts With, Contains, Ends With, and Is - are self-explanatory. The last selection, Matches RegEx, allows advanced users to blacklist items based on comparisons to a sophisticated text-processing syntax called "regular expressions."
Finally, enter a text or regular expression in the Pattern field.

You can also add entries to the Blacklist filter by dragging and dropping a card from Apple Address Book. First, ensure that both Apple Address Book and the Blacklist filter pane of Personal Antispam are both visible. Then, click the card you'd like to add in Apple Address Book and drag it into the blue-and-white striped area of the Blacklist Filter window. The icon will change to display a + sign; when you release the mouse button, that person's primary e-mail address will appear in the Blacklist fiter.

No matter which method you choose, Personal Antispam will mark as spam any messages that match items you have added to the blacklist filter in this manner.
As with the Lexical filter, you can remove words from this filter, by clicking a word (or Command-clicking several words), then either clicking the - button or pressing Delete. An alert will ask you to confirm your decision.
Whitelist Filter Settings
A whitelist is the opposite of a blacklist: it is a list of addresses whose messages are always accepted as valid. Personal Antispam offers several options to ensure that you don't get false positives: you can choose to always allow senders in Address Book, which is Apple's contact manager program and the software that stores your addresses if you use Apple Mail. You can also have Personal Antispam add senders' addresses to the whitelist when you tell it to learn messages as legitimate, ensuring that e-mail from your friends, co-workers and contacts goes straight into your inbox.
To view settings for the whitelist filter, click on Whitelist in the filter list at the left of the Personal Antispam window. You can view statistics, add filters, or remove filters in the same manner as with the Blacklist filter.
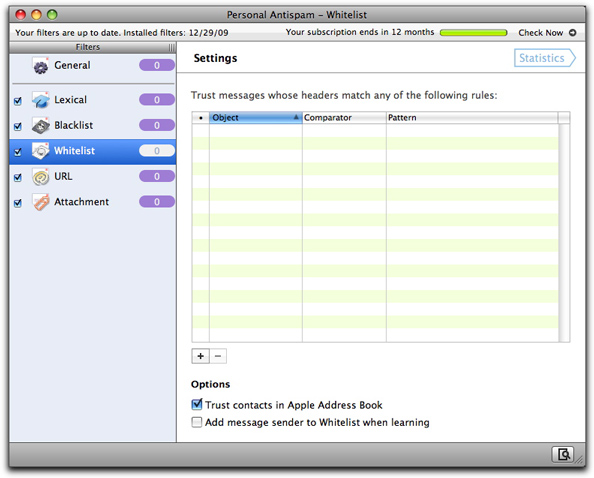
The whitelist filter offers two options to help Personal Antispam function optimally. If you check Trust contacts in Apple Address Book, Personal Antispam considers all the contacts in your computer's Address Book to be valid senders, and will never mark messages from any of these contacts as spam. (The whitelist filter does not recognize contacts stored in Microsoft Entourage or Outlook.)

If you check Add message sender to Whitelist when learning, Personal Antispam adds the senders of legitimate e-mail messages to the whitelist when you use the Learn Message as Legitimate function or AppleScript. This ensures that messages from these senders will never be marked as spam.
URL Filter Settings
Personal Antispam has a URL filter that checks for certain URLs, and the way URLs appear in e-mail messages, to detect spam. Spammers often use techniques such as displaying one URL but hiding a link to a different URL in a message to fool recipients of their messages. E-mail with this type of URL is generally spam, and Personal Antispam searches for this, and other techniques, when analyzing your incoming e-mail.
In addition, Personal Antispam uses a special database of URLs that are known to be used in spam messages. Intego monitors spam that is sent over the Internet and records URLs that are used in spam messages, and the regular updates to this database, included in the program's filter updates, help keep your inbox spam-free.
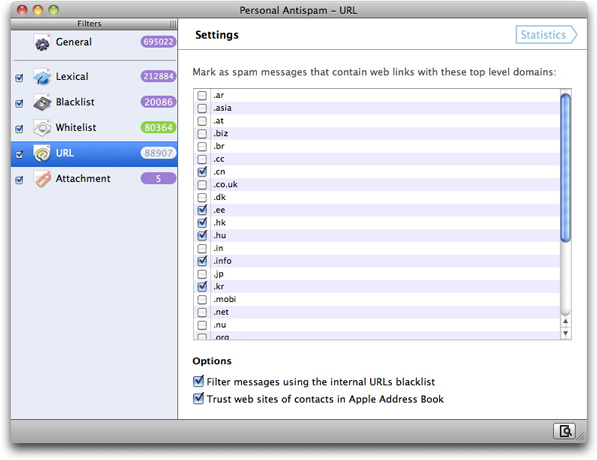
Finally, you have the option of disallowing e-mails that contain URLs for specific top-level domains (TLDs) other than ".com". Some spammers advertise their products through web sites outside of the .com domain for several reasons: if you don't typically get e-mails containing such domains in their text, checking these individual TLDs will mark all messages with those URLs as spam. (For example, checking ".biz" would block e-mails containing the URL "http://www.example.biz".)
To view settings for the URL filter, click on URL in the filter list at the left of the Personal Antispam window. (Viewing statistics works the same as with the Blacklist filter previously described.)
This filter offers two options. First, checking Filter messages using the internal URLs blacklist gives your copy of Personal Antispam the advantages of Intego's spam-tracking team, which continually maintains a list of web sites often advertised in spam. The second checkbox, Trust web sites of contacts in Apple Address Book, overrides your other selections to permit messages advertising your friends' web sites through the filter: however, such messages could be stopped by other filters, such as the Blacklist or Lexical filters.
Attachment Filter Settings
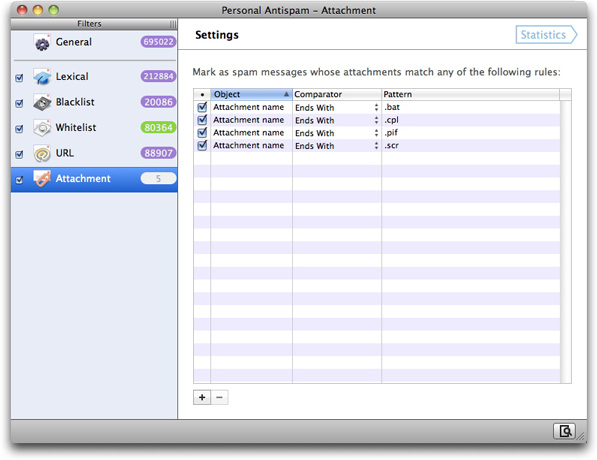
Some spam can be detected by attachments, files sent together with messages, such as images, PDFs and other types of files. Personal Antispam checks for certain types of attachments that may indicate spam, and also checks for .bat, .cpl, .pif and .scr files, which are generally only sent with messages by Windows viruses.
To view settings for the attachment filter, click on Attachment in the filter list at the left of the Personal Antispam window. You can view statistics, add filters, or remove filters in the same manner as with the Blacklist filter.
The Personal Antispam Log
Personal Antispam keeps track of all its activities in a Log window, which you can see by clicking the small button in the bottom-right corner of the window.

You'll then see a window that lists all e-mails you've received, how Personal Antispam handled them, and whether you directed the program to learn them as spam or legitimate. Here's what the log window looks like with the Spam button pressed:
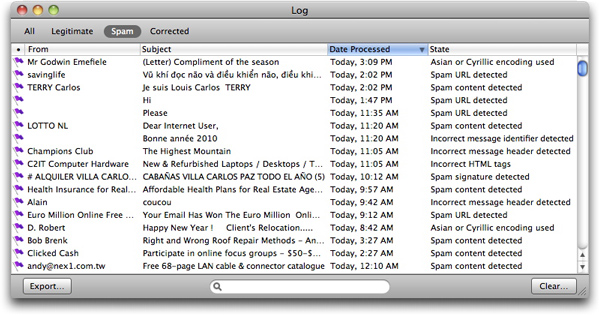
The columns show who sent the message (according to the From: header), the Subject line, when Personal Antispam processed it, and the action taken. Actions can be any of the following:
For legitimate messages:
- Legitimate (did not match any spam filters)
- Learned as Legitimate (you explicitly said that the message is legitimate)
- Matched Whitelist (passed a test you set in the Whitelist filter)
For spam:
- Learned as Spam (you explicitly said that the message is spam)
- A description of why the message was tagged as spam. There are numerous reasons, including: Spam content detected; Spam URL detected; Spam signature detected; Incorrect message header detected; Spam Server Header detected; Matched blacklist; Spam attachment detected; and others
You can limit the sorts of messages you see in the Log window by clicking the Legitimate, Spam, or Corrected buttons in the upper-left corner of this window. The Legitimate and Spam buttons are self-explanatory; the Corrected button shows only those messages you specifically directed Personal Antispam to learn as legitimate or spam. Note that the log only records the last 1024 messages that Personal Antispam has processed.
Clicking the Clear… button in the window's bottom-right corner removes all entries from the log, but does not affect your filters or the messages themselves. Clicking the Export… button lets you save the log you're currently viewing to a tab-delimited text file, which contains all the columns you see in the log window plus an extra one that simply defines the message as spam [S] or legitimate [L].
Running the Personal Antispam Setup Assistant
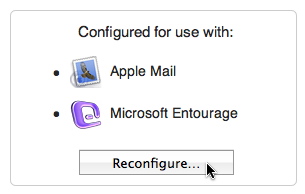
When you first configured Personal Antispam, the program's Setup Assistant helped you configure your e-mail program - Apple Mail, Microsoft Entourage or Outlook, or any combination of them. If you need to configure a different e-mail program, you can run the setup assistant again at any time by clicking General in the filter list and then clicking the Reconfigure… button.
See Configuring Personal Antispam, for more on using this assistant and configuring your e-mail program.
Exporting and Importing Settings
You can save all your Personal Antispam settings, and its spam database, in a special file that you can then import into another copy of Personal Antispam. This is especially useful if you manage many computers and want to use the same settings and database for all of them, or if you want to share your database with friends, family or colleagues.
Exporting Settings
To export your settings, select File > Export Settings… A dialog box asks you to name the settings file and choose a location to save it. Make sure not to change the .antispam file extension on the settings file after you have saved it.
Importing Settings
If you have exported settings from one copy of Personal Antispam (see above) you can import them into another copy of the program.
To import settings, you can simply double-click the .antispam settings file that you exported from another copy of Personal Antispam. This opens Personal Antispam, which asks if you are sure that you want to replace the current settings and database with those you are importing.
You can also select File > Import Settings…. A file dialog asks you to locate the settings file. Click Import and these settings are immediately applied to Personal Antispam.
Using the Intego Menu
Personal Antispam, like all other Intego programs, installs a menu in the menubar, called the Intego menu. Its icon is a small tower, as in the Intego logo.

Click the Intego menu icon to display a menu that shows all your Intego software:
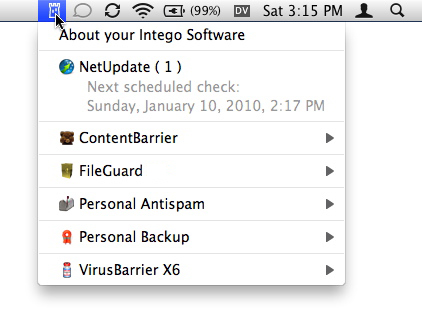
You can open Personal Antispam, or any other Intego program from this menu, and you can also open NetUpdate to check for updates to your software. In addition, if you select Personal Antispam from the Intego menu, a submenu displays giving you access to certain functions.
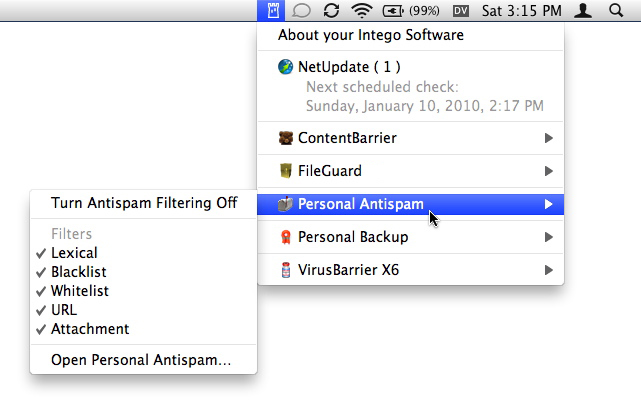
If you select Turn Antispam Filtering Off, you can deactivate Personal Antispam's spam filtering. You can also select any of the program's filters in this menu to deactivate them; if you do this, the check marks next to their names will be removed. Selecting an unchecked filter reactivates it. Finally, you can open Personal Antispam by selecting Open Personal Antispam…